How to create a new blog post in WordPress

You’re a busy small business owner seeking local clients or you’re an artist, author, or non-profit and you have a new website in WordPress and you want to improve your online presence. Woohoo – congratulations on the new website! If you worked with me on that website, then you had training on how to update your website with new blog posts. But, even if you took lots of notes, it’s just not that easy to recall how to create a new blog post so here are step-by-step instructions and a nifty tip or two about how to enhance your online presence at the very, very, very end of this post.
Step 1

Log in to your website’s WordPress dashboard by entering your username and password. You can save this information so that you don’t have to recall it for future reference; a nifty time saver as long as you are not using a shared computer. Click on the blue ‘login’ button underneath this information.
Step 2

In the WordPress dashboard, beneath the word “Dashboard,” see the thumbtack icon and the word “Posts”. Select (either by hovering or tapping depending upon which kind of device you’re using) “Posts” and then “New Posts.” You are now in the proper part of your WordPress dashboard to write your blogpost headline and content.
Step 3

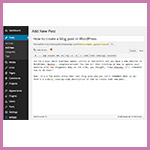
Here’s a pic of a blog post in progress (in fact, it’s this blogpost). Keep your posts packed full of helpful relevant tips for your ideal clients and use photos to describe various tips and points you offer. Over the years there have been all kinds of rules about blogpost lengths and number of photos to use. I like to think of all of these rules as ‘guidelines’ and here are a few:
- Have at least one image in the upper left hand corner of the opening of your blogpost.
- Write at least 300 words (some say write between 600-800 words but if you’re a solo business owner or artist and you struggle with posting blogs aim for 300 words – ok?).
- Post frequently and consistently is the best rule of thumb. How often you post, frankly, is up to you but here’s a helpful article to help you decide what frequency might work best for you and what you do.
Step 4
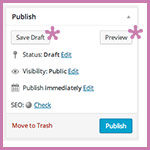
Before you publish your post, you can save a draft and preview it just to make sure that you like what you see before you select the ‘publish’ button.
Step 5
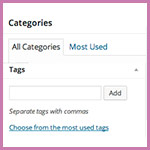
Select relevant and appropriate category(ies) and tag(s) for your blogpost. Check out this nifty but short and sweet article about this topic and use this to help you keep the categories and tags you do use relevant, helpful and timeless but not overly complicated.
Step 6
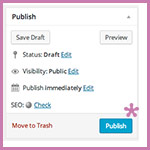
Now that you’ve finished writing your blog post, get ready to publish. To publish your post, select the bright blue “publish” button in the upper right hand section of your WordPress dashboard.
Step 7
Now that you’ve gone to all the trouble of creating your new blog post, respect yourself and promote it! Feeling a bit squeamish about tooting your own horn? Well guess what? No one else will, if you don’t! So go on and share that fabulous blog post about your business, art, book, fabulous non-profit mission. The world needs what you do and the internet needs your blog posts to make it easy for people to find you!
Why?
97% of consumers now use online media to shop locally. See the details here.
How?
Promoting your business online, especially for us (yes I include my own WordPress website/training/social media business here, too) really, really small solo or two-person business owners, can seem ridiculously overwhelming. But time and time again, when I ask people, “Where do you go first as you ponder and research a local purchase?” I get the same answer,”Google.” If that’s your answer, then I bet that’s what your prospective customers are thinking,too.
Step 8
![]()
To enhance your online, local presence, share your fabulous new blog post you’ve just written in your Google+ Business page (formerly called Google Places page and vitally important for brick and mortar business owners who want to appear in local searches for their business). Here are the links to help you create a Google+ profile and a Google+ Business page.
So if your new WordPress website is your very own plot of ‘land’ in cyberspace, then Google+ will act as the fertilizer to help your business bloom and grow online.
What do you think? Are you feeling ready to crank out some super savvy new blog posts about the amazing work that you are doing? Well then, go on, share them here! I look forward to hearing from you!

2 Comments
Anne
April 13, 2014Very nice tutorial Julie! I find it really helpful to commit to writing at least one blog post a week in the beginning. I did that, and after a while I noticed that it had gotten much easier to sit down and create a post. Thanks for beiing such a great resource for those of us still dipping our toes into the geeky pond!
Julie Holmes
April 14, 2014Hi Anne, Thank you! As with most skills, this is about cultivating a ‘system’ that works best for you. I love your idea of writing at least one blog post a week, too. I personally, have been unable to blog that frequently. However, I blog when I either have the same question come up from clients or I have a question that I’d like to answer for my own business. Once that idea/question/problem/issue is in my brain, the only way to make it feel ‘resolved’ is to read about it, write about it and ultimately, write a blog post about it. Here’s hoping one of these approaches, yours or mine, help others see that there’s more than one way to cultivate a blog, and an online presence for your business.